Bobike Mini+ On Brompton

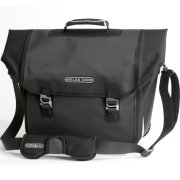
I hope someday in the nearish future my child will want to ride a bike with me badly enough to necessitate the itchair for my Brompton.  Until that day, I’m saving up my pennies, because at $360 it ain’t cheap.

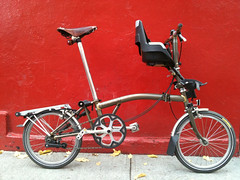
In the meantime, she’s small enough and light enough to use the Bobike Mini+, which I was able to find locally on CraigsList for $40 in a decent color and pattern.  The factory-supplied mount works great on my beater bike, but the mounting bracket was far too narrow to fit on my Brompton frame and it would have been too bulky to allow the bike to be folded anyway.  So I began work on a custom made mount.

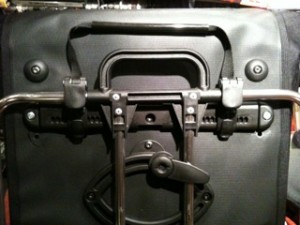
I contacted a number of local metal workers to build a small bracket with mounting tubes to accommodate the Bobike, but the job was too small for most of them to take it up.  Others, though interested, priced me out of the market (one guy quoted $300-$500 for the part).  I’ve still got a couple of leads to follow up regarding a “production” version of the clamp, but on Thursday I fabricated a first prototype mount and last night I completed the second prototype.

The construction is simple:  the bracket is held in place with a U-clamp that has been covered in plastic tubing.  The bracket itself is a piece of 1-1/4″ heavy-duty steel that’s been folded over on itself and drilled to accommodate the clamp.  There is a small spacer (made of wood) to keep the bracket spaced properly and to keep the Bobike’s pegs sit firmly in place.

The most recent design is pictured above.  A couple more photos: a close-up of the second prototype design and the bike half-folded in its natural habitat.

UPDATE 8/2012:  I’ve gotten some comments about this post and looking back on it, I’d probably recommend against trying this.  The chair itself won’t accommodate a lot of weight (it’s rated to something like 30 lbs).  I used this set up pretty regularly with my daughter until she was ~26 lbs.  But after that, her weight started to affect the bike’s steering negatively (especially when she moved around a lot, which toddlers tend to do).

In New York you must wait until your child is 1 year old to put him/her in a bike seat.  One year olds usually weigh in at ~20 lbs.  This means that there’s a relatively short window in which you can realistically use a seat like this.  And even then, the safety is a bit dubious (especially in my case with my shoddy workmanship).

The Downtown: a Better Brompton Bag from Ortlieb

Brompton sells a bag made by Ortleib.  The good folks at Bicycle Habitat have one in stock and it’s beautiful.  But they’re asking $350 for it!  That’s too much money.  Eric, at Bicycle Habitat, showed me the Ortlieb “Downtown” and we both agreed that with some tweaks (he reckoned one Sam-Adams’-worth, I figured closer to two) the bag would fit easily on my existing S-frame.  The Downtown retails for a still-steep, but slightly more reasonable, $150 (ouch! REI is selling it for $104).

I don’t normally drink Sam Adams, but in honor of Eric I got two from the corner bodega and broke out the tools.  Happily, the inner lining of the bag zips open to reveal the padding and guts within.  With a phillips screwdriver and torx wrench I removed some grommets, nuts, and bolts and the quick-release mount came off easily.  Then I measured and drilled new holes for the straightened bracket.

The finished product. Quick release with s-frame mounted.

Measuring for the S-frame, the bracket landed between the two existing mount points, about a half inch (at center) above its factory location.  I had to relocate the stabilizing cleat to the upper radius to clear the Brompton S-frame’s hardware.

The Downtown bag is slightly larger than the Brompton O bag (30 liters vs 22 liters, based on my own measurements) and is, in my opinion, better looking.  The mount certainly isn’t as elegant as the built-in Ortlieb/Brompton O bag mount (which is really nicely done).  But come on… the modified Downtown costs half (or 1/3) as much and is twice as flexible!  I can now use this bag on any of my other bikes with a rear rack (I’ll simply remove the bag from the S-frame and click it onto my other bikes’ rear pannier rack).

Also, I have the satisfaction of having built it myself.  Degree of difficulty: 1/2 Sam Adams.

LED Headlight


Tonight I did a much simpler version of this to turn a regular dim incandescent bulb into a three-led super-light. It did take some soldering, but the job was straight-forward (no “electrical” work was required).

UPDATE: This doesn’t work. Some “electrical” work is required. The bulb works for a mile or so, but dims and eventually goes out. I’m going back to incandescent.

‘Tis the Season Not to Have Enough Lights


I was putting up the christmas tree this evening and (surprise) all of last year’s light strands worked. However, when I string the lights each year, I realize that I have to continually readjust them until M approves of the light distribution. I thought, “self, there must be some calculus that could help me solve this problem”. So I did the geekiest thing I’ve ever done in my life… I built a “Christmas Light Calculator“. It’s based on Ken Muldrew’s Christmas Tree Calculator. Is the math correct? I don’t know, but 83.5156′ of lights sure seems like a lot!

DIY Seltzer Water

[youtube]http://www.youtube.com/watch?v=4AQi9x_Ueho[/youtube]
M returned from Philly this weekend with a 15lb CO2 tank. We hooked it up to the regulator, hose (with ball lock), and “carbonator” cap that I got from Northern Brewer and it worked great. From construction to carbonation took about 10 minutes. Video is here.

The set up is basically the same as this one. I set the regulator to 40psi, but I’ll experiment with other settings.

The steps are this: take a 3/4 full bottle of chilled liquid, attach the ball-lock cap, evacuate the air, connect to the hose, apply pressure, shake like mad, drink.

In this case I carbonated water and pomegranate juice. It’s really tasty and quite cost effective ($.01 for the water, $.02 for the CO2, and $2.50 for 1/2 liter of Georgian pomegranate juice that I get across the street). We plan to experiment with other juices and kefir d’acqua that M makes.

Update: I used way too much pomegranate in my first experiment. Subsequently I tried it with just a couple of ounces of juice and it’s much better.

Beeby’s Broth

I was listening to a podcast of Science Friday the other day (yes, I am a nerd), and Michael Pollan was on talking about his new book In Defense of Food. He actually came across as a reasonable fellow in the interview — all of the other press I’d heard about the book made him sound like a very unreasonable, local-only-organic-granola freak. During the show a whacko caller mentioned something called “Bieler’s Broth“, which I vowed to try next time I was feeling under the weather. Well, today is the day.  I made a slight variation on the recipe linked above:

Beeby’s Broth

  • 1 cup water
  • 2 cups green beans
  • 3 cleaned stalks celery
  • 2 zucchini
  • 1 handful parsley 
  • 1 tbl sp olive oil
  • 1 pinch salt
  • a touch of hot sauce

Bring the water and salt to a boil and steam the beans for 5 minutes. Chop the celery and zucchini and add to the pot. Cook for an additional 5 minutes (or until all of the vegetables are tender). Pour into a food processor and puree. Add the parsley and olive oil. Puree the hell out of it. 

The result isn’t the best tasting recipe in the world, but it’s a lovely green color when it’s done and I get the feeling that it’ll do great things for me. The consistency isn’t what I would call “pea soup” because the parsley is still rather crunchy.  Try at your own risk.

IBM ThinkPad Transnote Sans “Note”

There wasn’t much I could do with Audrey in my network “closet”, so I retired the old girl this weekend. I figure that I’ve gotten my seventy dollar’s worth in the four years I’ve owned it, so it doesn’t hurt too bad.

In its place, I installed a 2001 vintage IBM ThinkPad Transnote. The last time I tried to start this ill-fated piece of technology was over a year ago and it wouldn’t boot. It seems that a deep battery run-down solved its OS problems; this time Windows 2000 started without a hitch.

I knew I’d never be able to wall-mount this goose-necked, touch-screen marvel unless I were able to take off the portfolio cover and paper pad assembly. There are a number of screw covers and tiny screws around the periphery of the case, which I removed. The faux-leather binder and paper pad came off easily. After disconnecting the notepad cable, I connected the battery, plugged it in, and crossed my fingers. The stand-alone tablet booted without a hitch. I was able to use Audrey’s mounting hardware (a $1.29 set of “heavy duty” mirror mounting brackets) to attach the ThinkPad to the wall.

The battery life isn’t great, but I can take it down anytime I need a wireless Windows machine (to test a Web site in IE6 or whatever). Additionally, I loaded it up with free software (Gimp, iTunes, OpenOffice, Arachnophelia, etc), so it’s actually a pretty competent little bugger. And jeer all you want, but at just over 3/4″, this thing is as thin as a Macbook Air.

DIY Lunchmeat

This may be a dumb post for anyone who’s ever cooked before, but it’s amazing how simple, cheap, healthy, and tasty homemade lunchmeat is! M got a turkey breast at the co-op on Tuesday, which I roasted today with a bouquet of thyme and a slab of butter. After two hours baking and an hour resting, I sliced half of it for sandwiches (pictured here). It’s an easy week’s-worth of sandwich fixings for about 1/3 of the cost of those watery, nitrate-packed deli counter meats.